Category: knitwear design

Holiday giveaway

Less blogging, more knitting these days. These are not particularly words to go by, but not so much of personal knitting.
Around this time last year I have been working with Blue Sky Alpacas yarn company on creating new designs for this fall/winter season.
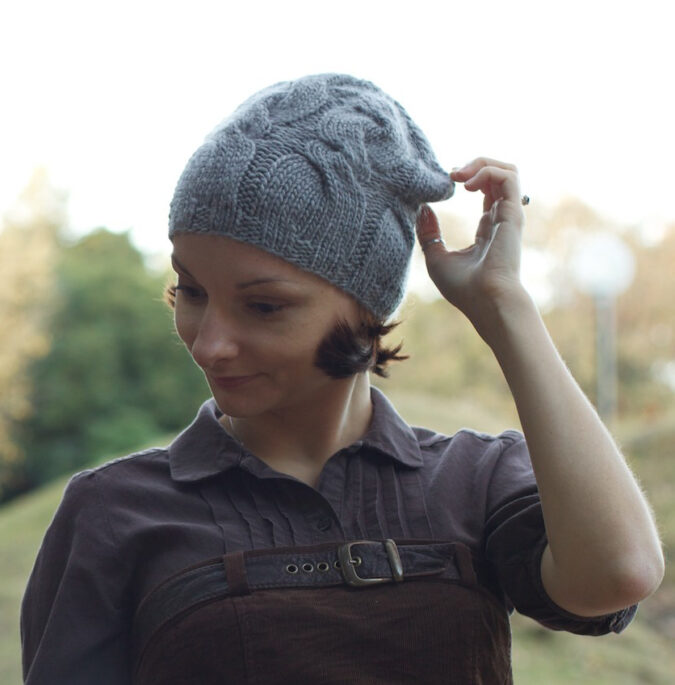
Notice the gorgeous models that are are modeling my knitwear designs, great styles and photography too! I feel really lucky to be able to work with this company and their luxurious line of yarns.
As a result you can see 3 various garment designs using Suri Merino, Sportweight Alpaca, Brushed Suri and Techno…

Pleated Jacket
View on Ravelry

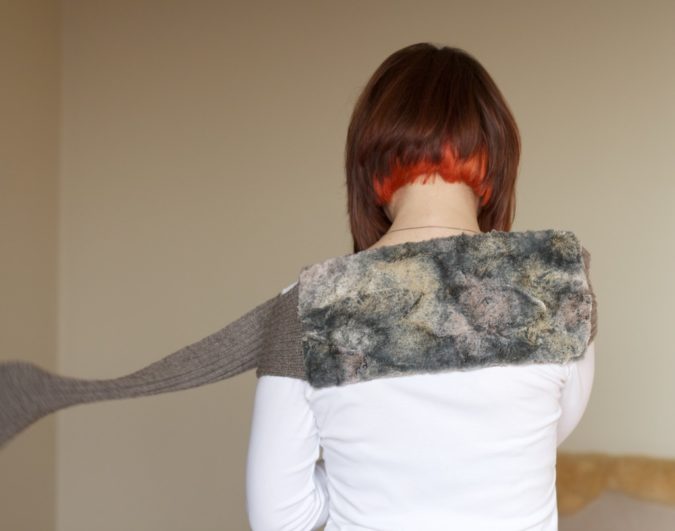
While constructing this design, I really wanted to make it with little seaming as possible while trying to incorporate this wide box pleats collar. I have succeeded in doing so, this jacket is worked top down and you only have 2 small seams to complete once you are finished knitting. Classic feminine design with modern detailing on the collar.

Fitted Lace Pullover
View on Ravelry

In wintertime it is great to have one of those fitted thermal go-to sweaters that you want to wear around all the time and depending on your color choice you can have one transition from casual to evening looks. I have chosen to use 100% alpaca yarn but the idea of wanting to balance out the heat factor, since alpaca is 30% warmer than wool, I have chosen to go with this eyelet lace pattern and evenly distribute it throughout the pullover. It creates sort of “vents” for your skin. Finished with ultimately luxurious and soft Brushed Suri collar caressing the neckline. So your choice of favorite denims, favorite slacks or a full skirt!

Aprés Vest
View on Ravelry

I was among the group of few designers who got to test this new yarn and create initial designs from BSA Techno. This yarn features amazing construction on its own – a mesh tube that has alpaca fibers blown into it, which makes this yarn air-light and luscious, as good as luxury comes! For example, if you make a cabled coat in it, it would weigh much less, it is not spun but it reminds me of woolen spun yarns, that are lofty and soft and light! The vest I have designed using Techno is suppposed to mimic one of those down type vest you wear in cold season either to layer or to throw on for a car ride. Despite being so lofty, it is very warm as it majorly consists of alpaca fibers.
And yes this is beautiful Raina from American Next Top Model modeling the vest! (She recently appeared in Bon Iver music video! Love that band!)

So as a gratitude to all my supporters and in lieu of upcoming holidays I am giving away 3 sets of patterns, each set contains a printed copy of each the designs above.
Rules are simple, leave a comment on this post by Tuesday, December 13th, 1:00AM EST
I will randomly choose 3 winners and announce them later on the blog.
For all participants, please leave a valid email address or link to your valid blog, so I can contact you later.

Good Luck To Everyone and Happy Knitting!!

Knits and pelts


Have you ever as a crafty person clung to fabric leftovers for years in hopes that one day you’d have just the right project to use it for? I know I have… and as much as many of your would like deny that once you deal with fabric or string or yarn.. it’s hard to get rid of leftovers in general! Your mind doesn’t always come up with ideas that very minute, but in some time you hope it does! This same route I’ve been going ever since I’ve discovered this faux fur! Honestly, it’s the best faux fur made in the world, so I am sure you can see my point about holding on my scraps…

I have had this idea for a while, but as usual timing and whole slew of things in the way… Finally, I made it! The hardest part was picking out the color of the yarn that would match my faux fur color close enough, but yet not distract with its texture or color variation.

Faux fur produced by Tissavel is one of the best in the market, Made in France, feels and looks (most animal prints at least) like real fur. So real, in fact, one day in D.C. I was walking to work from a metro station and startled by some (PETA?) guy screaming: “Do you know what your coat is made of?!!!” To which he heard my response: “Yes, cotton and viscose!” He was stunned and I walked away winning! 🙂 So my point is that this faux fur even with undercoat of different shade looks very real. I know if one touches it – all you’ll want is to pet it all day!

I’ve had some Tissavel leftover pieces from my mom’s work for a while now. I know even some friends of mine got bits of it here and there as well, it’s really great!

But if you are not a fan of sourcing out a pieces of faux fur you like or fuss over sewing at all, you can go knitting route all the way. And you can do that using two methods:

First, you can find the yarn like Berroco Nanuk or other fluffy yarn that would make a nice cushy pelt for the center of your scarf.

OR

You can knit ANY yarn to create center rectangle using Loop Stitch technique. I suggest using some yarn with a great content of alpaca or suri, so it’s even fluffier. If you wish you can even cut those loops, so it’s more fur looking… Kind of like this Stella McCartney fur vest.

Fur substitute rectangle should be 12″ by 14″ if knit flat, when folded and seamed into a tube it should measure 6″ by 14″.

Now for the ends:
I’ve used Pear Tree 4-ply Merino yarn, which is 100% Australian merino. It’s more of a DK weight and I used US 6 (4mm) needle to go with it for my knit 2, purl 2 ribbing pattern.
My gauge is 7.5 sts per 1″ over Ribbing pattern.
You can choose a different stitch pattern for knit part of the scarf as long as you get the necessary dimensions.
Scarf width should measure 6″ in washed and blocked form. I suggest to make a little swatch to calculate correct number of stitches to cast on for your yarn choice and needle size.

Cast on 46 sts.
Row 1: *K2, p2*, k2.
Row 2: *P2, k2*, p2.

Repeat rows 1-2 until scarf end measures 35″ from CO edge. BO all stitches in pattern. Then make a second scarf end identically. Weave in all ends, soak and block your knit scarf ends to measurements.

For faux fur insert cut 12″ by 14″ rectangle plus 3/4″ seam allowances.

Fold the faux fur rectangle with public side facing inside, then pin first scarf end to the right edge in place between 2 folded ends of the fabric. Stitch by hand to hold in proper place, making sure that sides of the scarf do not bleed over the marks where the knit insert has to be stitched.

Take second knit scarf end and repeat as for the first scarf end only pinning it on the other side of the faux fur rectangle.
Once knit scarf ends are placed properly, use sewing machine to stitch the scarf ends securely in place. You can go over it several times if you’d like.

Then shift both ends of the knit ends to one corner. Pin, then hand stitch to hold in place along the side. Machine sew along the edge to close the side of the rectangle as much as possible with ends still sticking out. Trim excess selvedge fabric.

Carefully pull on the knit scarf ends and turn faux fur rectangle inside out. You’ll have two scarf ends attached to a fur rectangle. Last piece of business is closing that small opening. Using sewing needle and matching sewing thread hand stitch it closed by inverting the selvedges inside along the lines and sewing it shut in a manner of small Mattress stitches.

Voila!!

Now you can get one yourself as well or there is still time for holiday gifts!!
Happy Crafting!!!

Hado for your head

How did October happen already? Summer.. is if it never happened, the busiest time for knitwear designers, getting all delicious knits ready for Fall/Winter collections. But I want to still document and share my year’s work.

All the way back in early Spring I have been asked by Andie of Renaissance Hand-dyed Yarns to consider creating a design using her naturally dyed yarns. That was what draw me at first, but who can pass up an opportunity working with Blue-faced Leicester wool, that is one of the softest and luxurious things in this world! While swatching and thinking of the possibilities I have decided to settle on this lovely color combination pack to create a slouch hat. Not just your regular slouch, cool enough to show off the colorwork and with some lace thrown into it..

It almost has a Missoni feel to it, but what is great – one can easily choose to customize it. I have worked it using 4 colors in this pack, but one can easily choose to make it a solid version or even transitional colors to show off “ombre” effect.

Hado Slouch

Hado 波動 (jap.) – wave motion, surge.
Colorful reflections on water surface and gentle breeze waves are recreated in this slouchy hat through intuitive lace pattern and combination of stripes to brighten up a chilly day and keep warm.
Fingering weight
24 stitches and 56 rows = 4 inches in 3 by 3 rib on smaller needle
400 yards (366 m)

$6.00

This design has great potential for leftover fingering yarn, another stash-busting project or a gift that can be loved and well-appreciated. Taking a page from recent madness over Missoni line in Target, you can easily make some for yourself if you are a fan or have missed that event. I am a known “offender” in loving chevrons, Missoni-styles, so you can also see my other designs like Serapo Hat and Palisel Hat.
Now I will be back with more once I finish some pattern writing for new designs 😉

Dot Dot Dot


Trying to remember now what is that moved me to design this… Winters in Japan are pretty mild, just cold, dry and sometimes windy and rainy, not much snow where we reside. Mix of grey skies during the day and if we are lucky enough – a pretty sunset over the mountains. So being tired from dull greyness after a long winter, eye is simply begging for some color.. In anticipation for first Spring colors I became impatient and in February while perusing fresh off the runway Fall/Winter 2011-2012 runway collections I had POLKA DOTS stuck in my mind! I have purchased this souvenir yarn from Purl Soho in New York years ago while on a quick trip with Vanessa.


Mizutama (from Japanese) means exactly that – polka dots.
My Mizutama shawl used a perfect bright, almost acid yellow yarn. Yellow and grey combination has been one of the longest color obsessions I’ve had, so I thought the grey of the skies would go so well together.

The design is a triangular shawl, but in a pattern I give 2 choices for knitter to make it. You can either start from the tip and increase it, so naturally you would get more and more stitches with each row. While knitting it that way, it is easier to customize and make the shawl even bigger/wider wingspan.
The other option in the pattern is to start with the biggest number of stitches and continue working it down towards the tip of the shawl. So whichever strikes your fancy – you can do it all!

Ravel It!
Yarn: Koigu KPM 2.5 skeins or 470 yds of any other fingering weight yarn
Needle: US 6 (4 mm)

$7.00

On a nice spring day when disaster struck Japan, I was actually getting dressed to go to a local park to take photos of my new designs, Mizutama was among them, I stood in the bathroom doing my hair while doors and everything started violently shaking..
I have tried to put my stress to work, still thinking of the situation, but trying to do something that would bring some feeling of normalcy to our everyday life… This pattern was published back in March.

We did go to that park later in the day to find a gorgeous Mimosa tree in full bloom with millions of yellow globes that are were also speaking polka dots to me…

Ensō Vest


So last year around Fall time I had been mulling over an idea of making a fun new vest, but being generally not a vest person, I wanted to stick to things that I am most passionate about – versatility, something geometrical, one-of-a-kind and yet very wearable. I have been playing with basic geometric forms and pondering ideas, very much inspired by Issey Miyake and their new line of 132.5. Where all the clothing can be worn but creased at the lines that collapses/folds flat into a geometric shape… I have spoken to Cirilia who worked at Berroco at that time and she along with Norah Gaughan were very kind to make this design into reality! Thank you very much, ladies!!!


I have taken two circles and “Ensō” in translation from Japanese means a circle, it is also a very sacred symbol in their culture as it has many meanings and functions. I have imagined a puffy vest, almost like one of those down type that you would put on over your clothes in the winter for a ride in a car or a chilly walk in the evening to keep extra warm. To make the puffy look I have decided to go with a welted stitch pattern over a solid color yarn, because it gives volume and depth and a pretty stitch pattern. I have worked out a way for this vest to be reversible without actually making 4 circles and seaming them. Ensō Vest is worked flat using short-rows and when you are done, you simply graph the live stitches together and voila – it’s already folded at the outer edge and you have doubled fabric!


You even have opening all around the armholes if you wish to stuff it with fiber fill to make it more voluminous. So two identical circles, joint at the part of an outer fold to create a back seam. What’s more fun is that knit fabric is so elastic it allows you various ways of styling this vest of even fold it some more and turn it in this oversized scarf.


I know timing may seem odd talking about this design today, but I have published this pattern back in January and due my hectic schedule I wasn’t able to tell you about it’s little story! And I’m really proud of this design. I know Winter has come to our knitter friends down under and it’s never too late to start knitting for the colder season, because afterall that is the time when we need and appreciate our warm knits most.

Some specs
Yarn: Berroco Peruvia (100% wool from Peru), in Vino Tinto colorway 7153;
680 – 1240 yards (622 – 1134 m)
Needle: US 8 – 5 mm
Sizes available:
To fit bust sizes 31.5, 33, 34.5, 36, 37.5, 39, 40.5, 42, 43.5″

Find it on Ravelry

$ 7.00

Festive

M E R R Y  C H R I S T M A S !

I know this is the season of all kinds of Holidays, for example we celebrate 2 Christmases and 2 New Years, fun isn’t it?! All the rushing to finish the gifts in time.. just like many of you I was still knitting on a gift on Xmas Eve… Go me! I finished and it even dried by the Xmas morning, went “green” by skipping the wrapping paper and it’s really loved by the recipient. Although his last hat he *cough* felted in a washing machine *cough*, but it all happened to us once in a while….

The hats are never enough, they have to go with some particular outfit, match the style and go in color, at least in my wardrobe… But there are never enough cabled hats. Classic, modern, slightly rustic and soft. I’ve had a skein of Rowan Cocoon left from my Sideways Cable hat from 2 seasons ago. So I put on a movie, get some DPNs to accompany my journey to a new cabled hat.

So this is Hineri.

Hineri in translation from Japanese means “a twist”. The cables of this hat are worked with a little more fabric in the twists in order to give them more volume and not be so visibly consumed by the twisting.

Some information about the materials:

Yarn: Rowan Cocoon or 130 yards (119 m) of any Aran weight yarn
Needles: US 8 and US 9 DPNs (or your other favorite method of circular knitting)
Gauge: 15 stitches and 22 rows = 4 inches in over washed and blocked St st swatch worked in the round on larger needle
Sizes available: 22, 22.5″
Pattern here

As it’s Christmas, this hat pattern is my gift to you!

We finally hit freezing temperatures here and I know blizzards are raging in the States. Time to go dig your stash for some bulky and let knitting of the hats commence!

Keep warm and stay safe!

Flogs Jacket

I think I have lost track of all the comments and compliments that poured into my inboxes for the past 4 days! Thank you very much for your gracious and kind compliments on Cable Braided Necklace. I am truly humbled that so many of you have found it amazing and have made it already. That little technique does go even further, but I hope to show it to you possibly next week. With this blog and with projects and deadlines and holiday craze it’s hard to keep promises. But we shall see!

Today I want to share a skeleton from my closet… that is something I have knit and worn and loved for many months and years now. It was planned and designed even much earlier prior to its final execution. But a staple that every wardrobe needs. Female or male. It’s rather unisex in style and simplicity, the overall textured look of it – effortless and quick. Dress it up or dress it down, for a ride down the country or belt it with a skirt and pair of heels.

FLOGS jacket being chunky shows a great example of Garter stitch and its great versatility. It’s very elastic and stretchy. With the right choice of yarn it can easily be that go-to cardigan or jacket for you.

For Love Of Garter Stitch.

Worked top down featuring circular yoke and seamless construction as sleeves are worked in the round. To accommodate many tastes, there are two various length instructions provided for the sleeves. Bracelet length and regular full length.

The stand up collar is great as it can reveal a little and hide some when needed. It’s rather wide, so a scarf can easily be worn around your neck and still be visible!

Here are some pattern specifications.

Flogs Jacket

I used Laines du Nord Korall, which is a discontinued yarn, but one can use any bulky weight yarn.

Gauge
15 stitches and 30 rows = 4 inches in over washed and blocked swatch in Garter stitch

Required yardage
830 – 1670 yards (759 – 1527 m)

Needle size US 10 (6 mm)

Comes in 15 sizes.

Finished bust measurements: 28.25, 30.5, 32.5, 34.5, 36.75, 38.5, 40.5, 42.5, 44.75, 46.5, 48.5, 50.5, 52.75, 54.5, 56.5”

Queue it up on Ravelry

USD 7.50

Happy Knitting and Happy Holidays everyone!!

Cable Braided Necklace

Yesterday, I have been deep in thought while sizing a pattern, deadlines all looming and sooo much to do before the year’s end. I have thought to share a great little technique with you. Something last minute that you can make for either a gift or for yourself! It’s been cool, so having that tiny bit of precious cashmere caressing your neck certainly felt cozy.


So here is what you would need:
Time: 1.5-2hr (excluding drying time).
15-20 grams of Fingering or Sport weight yarn.
Make sure to choose something delectable, tiny bit of cashmere, royal alpaca, merino or qiviut. Try the yarn on your neckline area first to determine the itchiness level as it’s highly sensitive area. So you don’t end up ripping necklace off after 10 minutes of wearing it. Finished/braided necklace measures approx. 22″.

Needle: US 4 (3.5 mm)
Crochet hook C or D.

Gauge: 6 sts and 7-8 rows in 1″ over Stockinette stitch swatch

Cabled Braids are made up by knitting 2 strips.

1st strip:

Using needle and yarn CO 9 sts.
Start by purling the 1st row. Work a total 7 rows straight in St st. On next row (RS): K4, yo, k2tog, k3.
Repeat previous 8 rows for a total of 16 times. Then work 15 rows in pattern. BO on the next row.

2nd strip:

Using needle and yarn CO 9 sts.
Start by purling the 1st row. Work a total of 15 rows straight in St st.

On next row (RS): K4, yo, k2tog, k3. Then work 7 rows in St st.
Repeat previous 8 rows for a total of 16 times. On the next row BO all sts.

If you wish to make strips longer – repeat the sequence from *.

Wash your strips, make sure to use wool wash to help and fluff those fibers. Or steam the strips if you don’t have time.

Then follow the photo guide to braid your necklace or bracelet or headband.


Insert the longer end of a strip into the first yarn over of the shorter end strip.


Then insert the top strip into the yarn over of the strip below (the first yo of the longer end strip).


Then continue inserting the top strip (they will alternate) into the next yarn over, make sure not to miss any and tug on them evenly.


The view from down under.


Continue braiding and once finished you will get two different textures in the same braid. Neat!


Using crochet hook take the ends of yarn and crochet a chain to make a loop to work as a buttonhole. I have flattened the edges of the strips and joined them together just by whip stitching.

I have had these gorgeous ceramic buttons from Jenny Potter for a while and the print on them matches the texture perfectly! Just sew on the button on the other end and weave in all ends.


There are multiple ways of wearing this little accessory. 22″ length was perfect to wear around the head as a headband.. almost makes me think of those very 50ies Prada cabled hair adornments, but I don’t have hair long enough to demonstrate it.


Or a nifty bracelet ..


I hope you all like it!

Happy Crafting!!!

Or queue it on Ravelry!

IMPORTANT: THIS PATTERN IS FREE FOR PERSONAL USE ONLY! ANY USE OF THE PATTERN OR FINISHED GARMENTS MADE USING THIS TUTORIAL AND INTENDED FOR COMMERCIAL PURPOSE WITHOUT WRITTEN PERMISSION ARE PROHIBITED. COPYRIGHTED. 2010.

Translated instructions for Cabled Necklace in FRENCH.

Translated instructions for Cabled Necklace in ITALIAN.

Translated instructions for Cabled Necklace in SWEDISH.

Detail in a Twist

I feel time of the past months just have been running like water in a spring brook. I wonder if all this sunny weather has anything to do with it, if it has been dreary and grey I bet it would have felt much more depressing, but au contraire – cheerful and warm.. even now in it’s 50ies, while many others are enjoying the excessive snow early this year!
I have only recently got a chance to start breaking out my hand knits. But I have been knitting so intensely… I feel very inspired this Fall and the opportunities are just great, so I can’t wait to share them with you. This week a new collection of patterns from Blue Sky Alpacas has been released and I am so happy to have a design included in it.

Knot sleeve blouse is made using unique and luxurious yarn called Royal. This yarn is from royal alpaca, without a hint of any guard hairs that makes it incredibly soft and warm.

Classically shaped with a deep-scooped neckline this blouse makes it easy to pair up with various other outfits in your wardrobe. Twist detail on the sleeve was really fun to work out as I had a vision how I wanted it to look like. In the end the instructions for it are fairly simple and even a beginner or beginner intermediate knitter can make them without a problem!
I really love the look of this Seaglass colorway, with it’s blue and undertones of seafoam teal… I personally think team at BSA did tremendously well with styling and photo shoot. I hope next month to get a window of opportunity and make one for myself, those sleeves just too cool not to have in my collection of handknits.

Here are some pattern specs:

Published in: Blue Sky Alpacas Pattern Leaflet
Published: December 2010
Yarns: Blue Sky Royal
Gauge: In St st with smaller needle, 26 sts and 38 rows = 4″
Needle Size: Size 4 (3.5 mm) 34-36″ circular needle, Size 3 (3.25 mm) 34-36″ circular needle and set of 2 double pointed needles
Yardage: 864 to 1,152
Sizes Available: 30, 32, 34, 36, 37½, 39¼, 41½, 43¼, 45, 46¾
For more information: www.blueskyalpacas.com
Notes: This exquisite fitted cardigan features a pretty scoop neck and an ingenious knot-sleeve detail.

Queue it up on Ravelry!

Stay tuned, new patterns and more coming this week!