Shibui Silk Winners

Congratulations to Amy, Tina and Robyn who each won a skein of Shibui Staccato and Shibui Silk booklet!!! I hope you all love it and can’t wait to cast on for those designs!

It’s still pretty cold here in Japan, even got “lucky” to be stuck in blizzard on the road in mountains near Nagano last week. (Don’t worry I had a knit project to entertain me on the road while bus driver was meandering through multiple tunnels and curvy roads). Beautiful landscapes are treacherous nonetheless. There has been lots of deadline knitting going on here, so lots of tea drinking and wearing of woolens to keep warm. Let’s speak of woolens next time. I have been having lots and LOTS of fun with them in the past year…

Decyphering Francis

Since Shibui Silk has been out for 2 months now and nothing makes me happier than eager knitters itching to put those projects on their needles. There have been lots of questions and inquiries about Francis and today I am going with a little step by step tutorial with photos what makes this tee so innovative – construction.

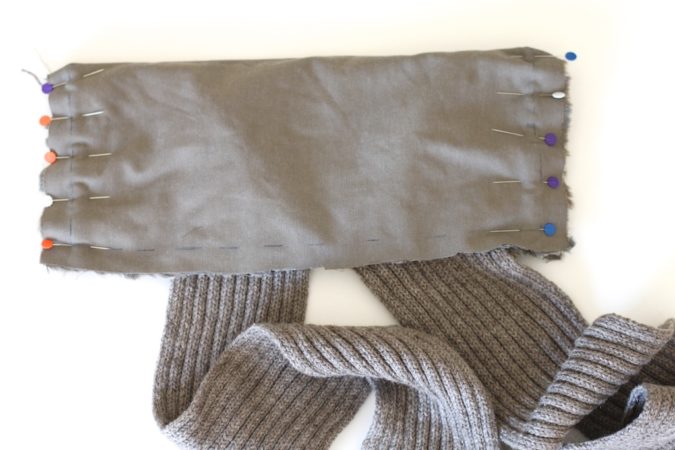
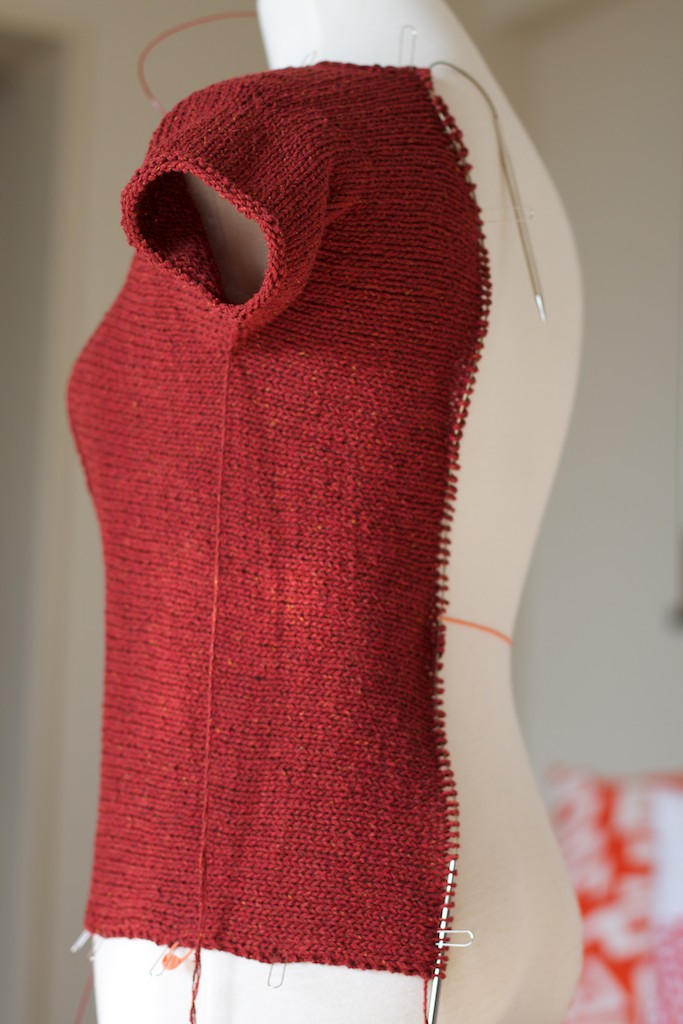
Francis is worked horizontally and in 2 parts. Beginning with the sleeve and working towards the middle of the front, while both backs are worked using short-row shaping, then overlapping. Yet there are no side seams, no shoulder seams. I know for a fact many knitters do not like seaming knits. I truly believe there are times when seams are a must simply for preserving the structure of your knit garment and you have to account for likely fiber behavior in your yarn after washing and wearing. But at times when I see there is a chance of making seams invisible – I am all for it.

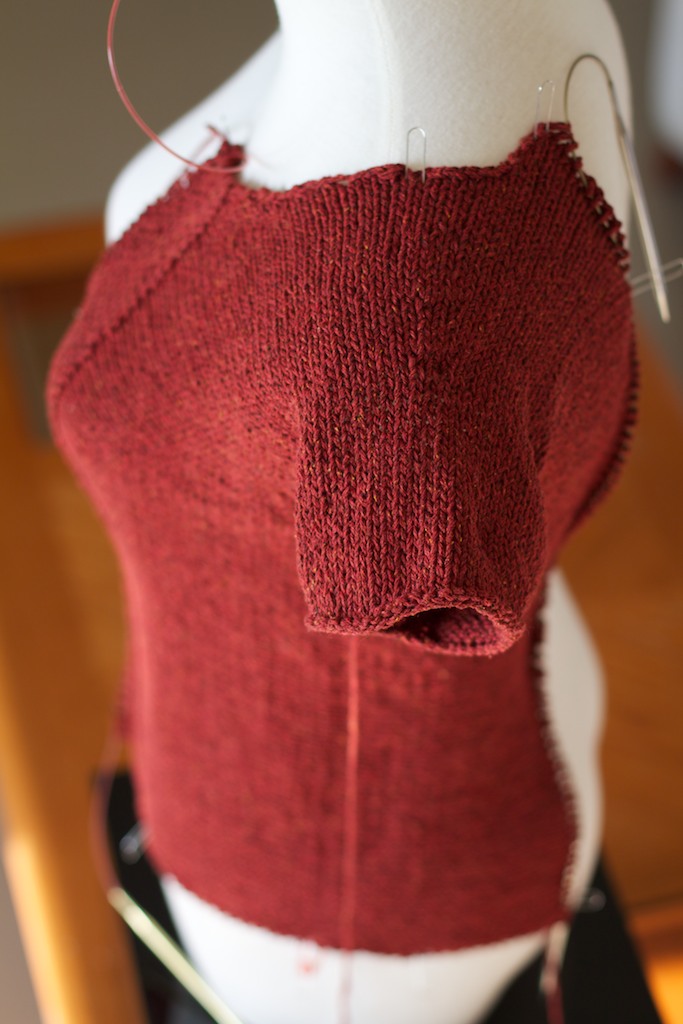
In case of Francis, although body is worked straight along the sides, the opening on the back is very flexible, that helps the Tee to acquire that slightly flared silhouette. And in case if there were side seams, they would naturally be riding up the front and be quite noticeable. Being a detail oriented perfectionist I didn’t want those visible details and Heichi is strong enough yarn to support this tee’s structure, so I have figured out how to make it go away.

1.


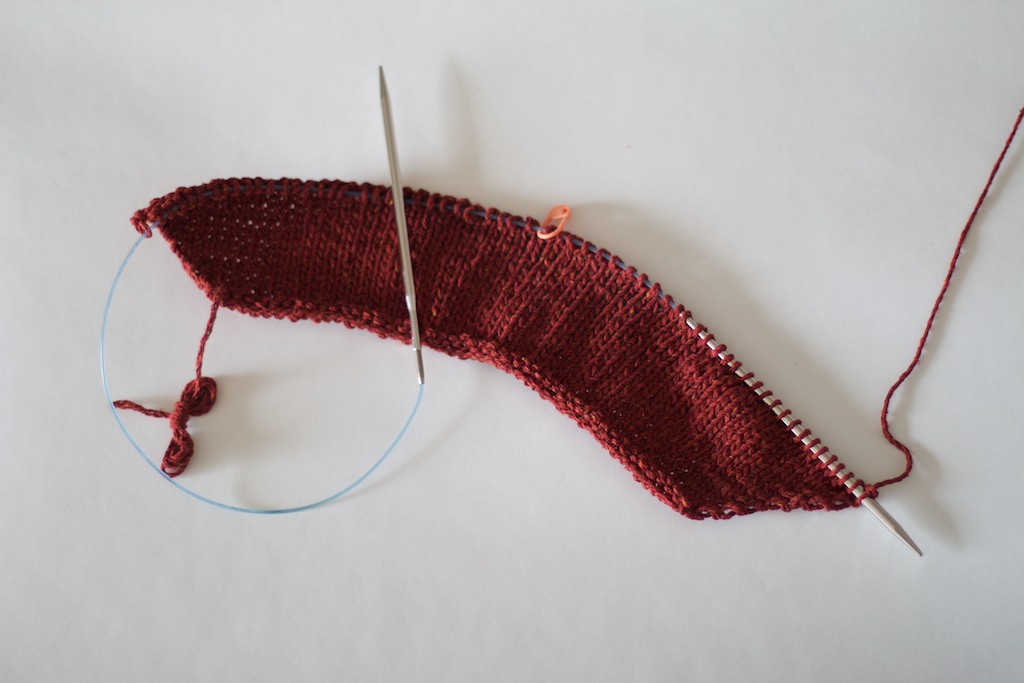
Starting with the sleeve and working your increases all the way till shaping is complete, ending with WS.

2.


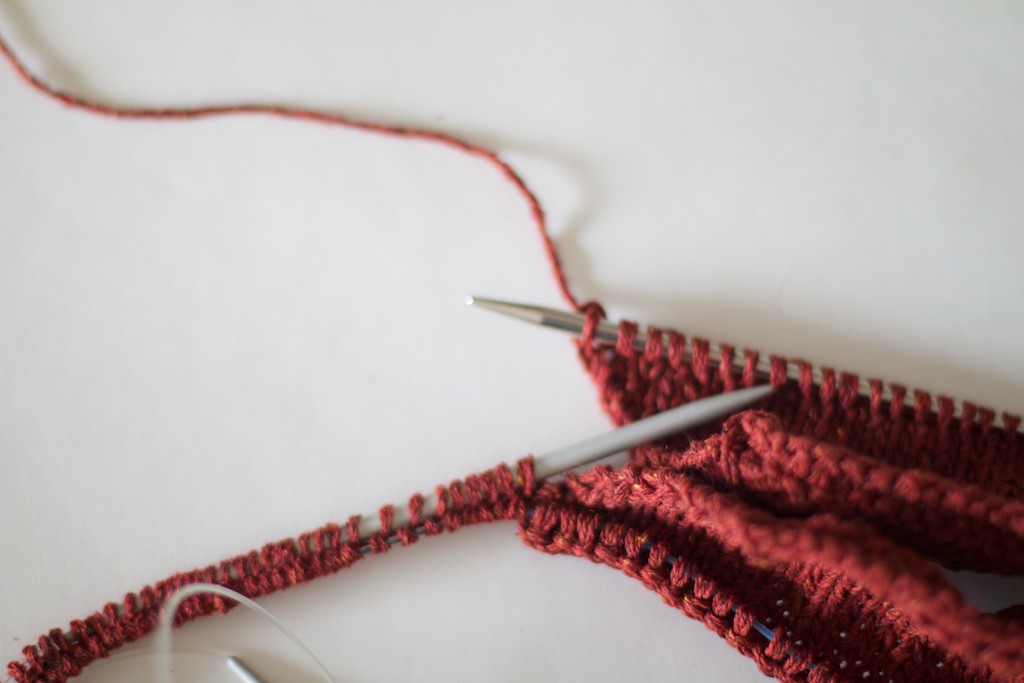
Next step would be casting on stitches with scrap yarn provisionally on a spare needle.
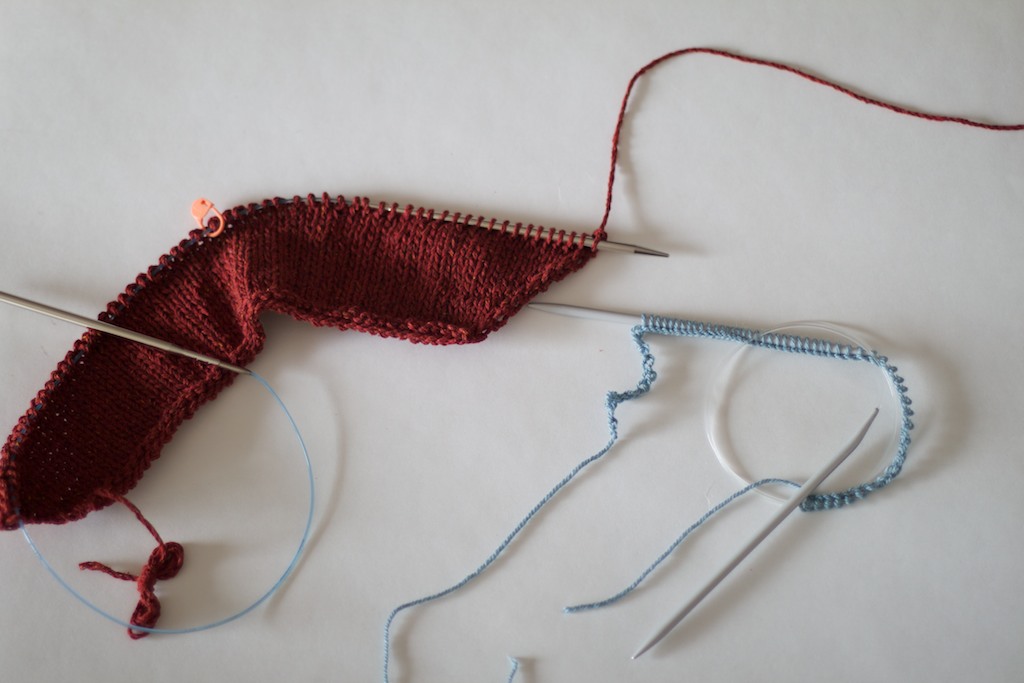
3.


With yarn still attached to your sleeve, purl across freshly cast on stitches.

4.


Now working on RS knitting across all of your stitches on the needle to the other end of your sleeve.

5.


This step is a little bit fussy. But you unravel scrap yarn from provisional cast on and place those stitches on spare needle.
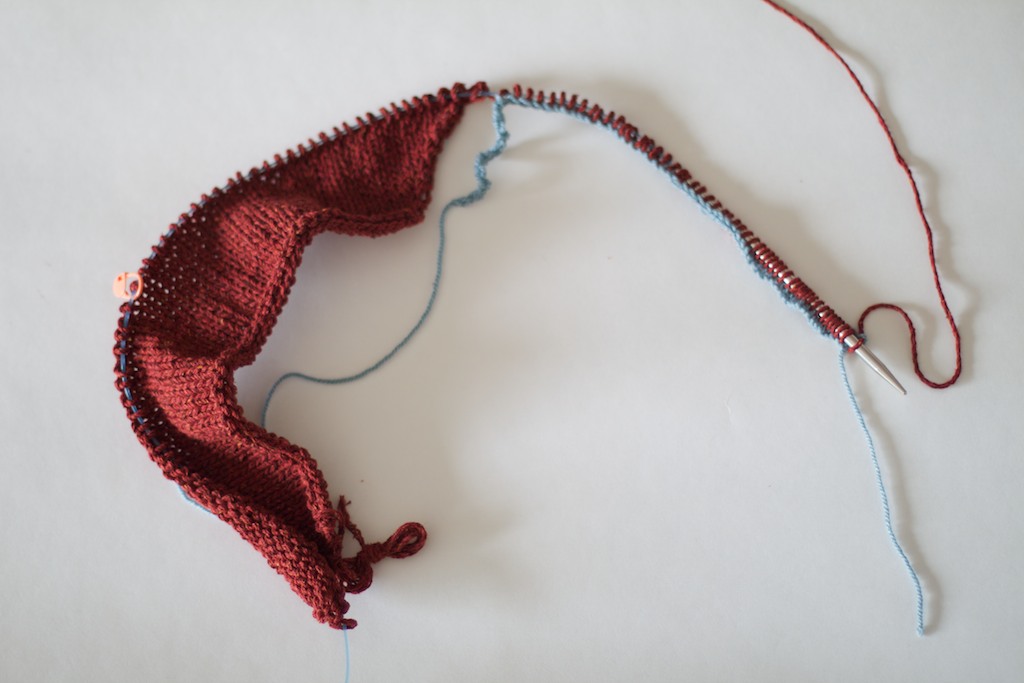
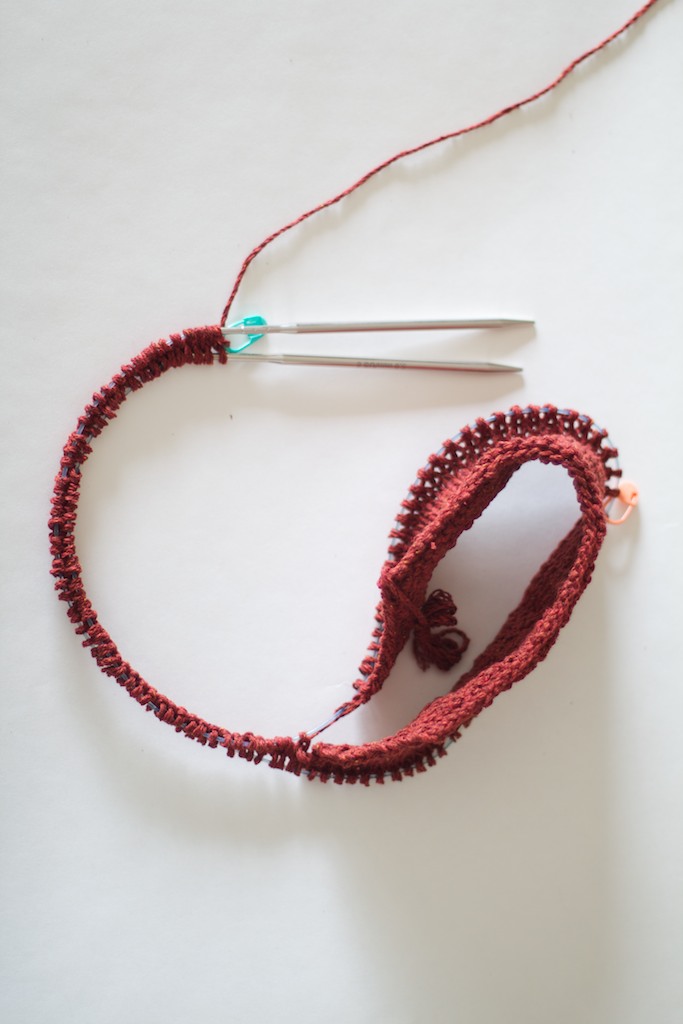
6.


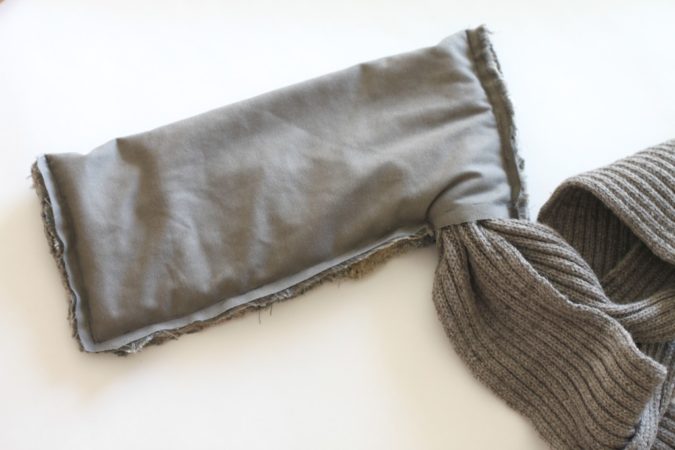
And this is the part that probably caused most confusion. Fold your sleeve slightly in half to bring your work needle to underarm/armpit to meet the beginning of your spare needle. Knit across those stitches on spare needle.
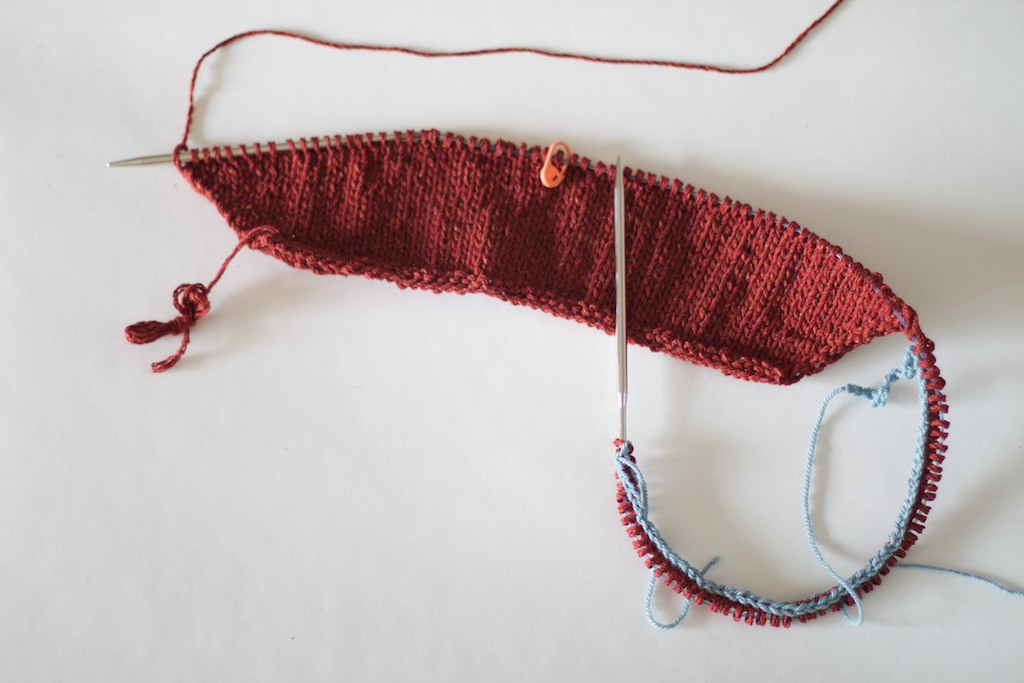
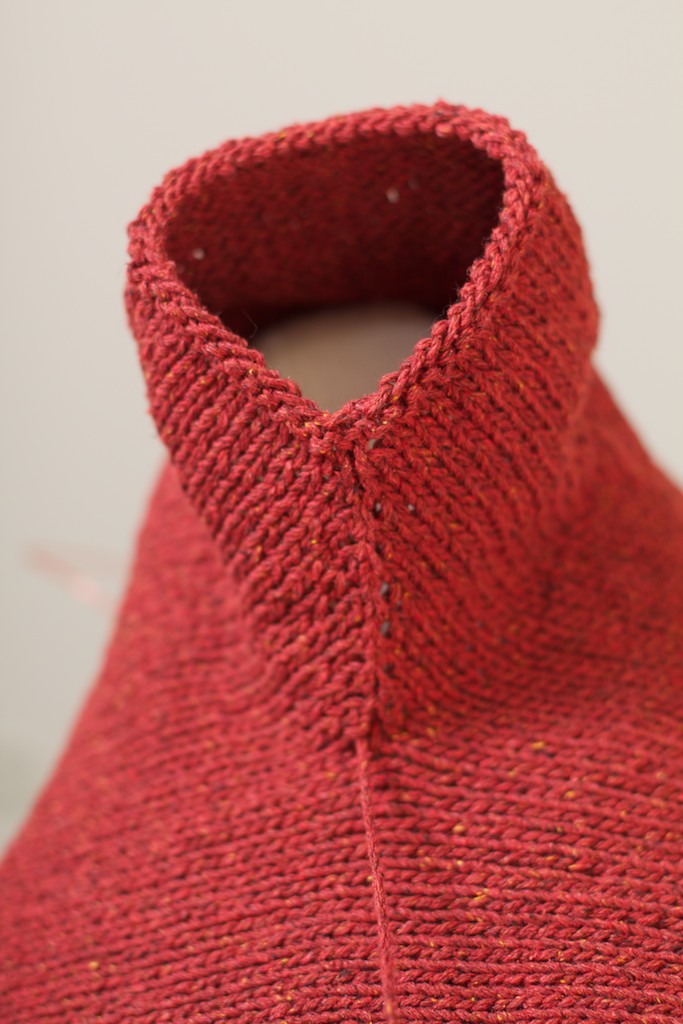
7.


In this step many have found it hard to work just with one long circular needle, so you can split your stitches between working and spare circulars. But what is happening here – you work from front hem up towards the shoulder, across your shoulder/sleeve, down towards the back hem. As one of knitters correctly compared it – you are working a “big upside down U”. And as you progress, you will find more fabric growing and working needle being sufficient in length to accommodate your knitting.

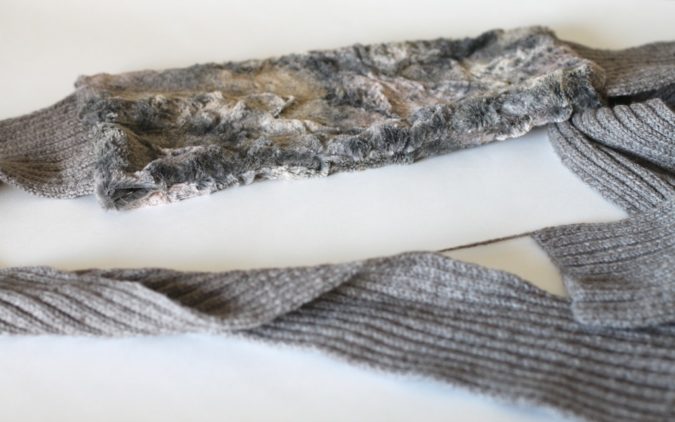
Use your tail to seam the sleeve seam and use excess of it to close up that underarm hole if necessary.


So ultimately, that invisible seam can also be worked in another way. If you are familiar with Eastern or Figure 8 cast-on methods, you can wrap yarn around both ends of spare needle and work it that way too, only from my personal experience I have encountered those methods to be a bit loose after first row and in need of tugging out/adjusting, while Provisional method I used avoids such problem.


View Francis projects on Ravelry knitters are working on or already completed

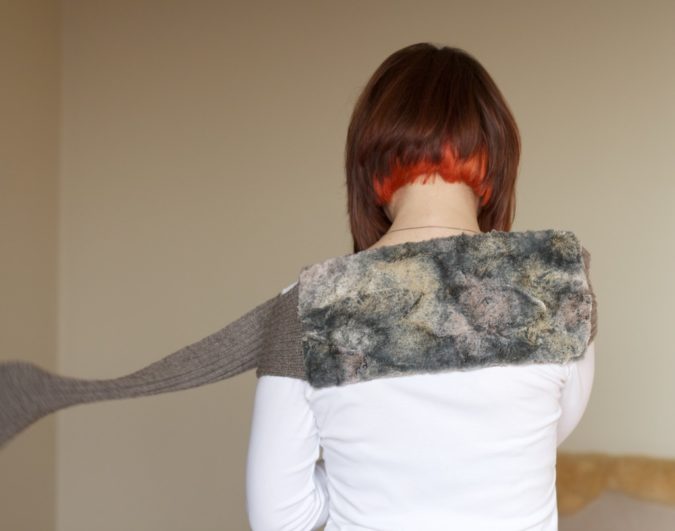
Francis in images above is being made in Brick and I can’t wait to finish it. Weather is warming up in Japan so it works as a great season transitional garment, to layer or as is. Heichi comes in array of trendy colors and lots of neutrals as well.

FRANCIS SINGLE PATTERN PDF
8.00

NB!
Couple days ago there has also been some errata discovered and I have updated Ravelry design page for Francis, but I am posting existing errata below as well.

Errata for the printed booklet ONLY:

For Left and Right Back Neck Shaping:
77 (80, 82, 85, 87, 90, 92) sts rem.
Work 31 (33, 37, 41, 43, 45, 49) rows even. Piece should measure approx. 5.25 (5.5, 6.25, 6.75, 7.25, 7.5, 8.25)” from last neck dec.

Bind off for the right back:
Next row (RS): Work to end, picking up and purling wraps tog with wrapped sts as you go. BO all sts kwise on the WS.

SHIBUI SILK

Now when I think back to 2010 it all feels months and many knits away, but it was at that time when the seeds for this book sprouted. Having worked with Shibui Knits folks before I knew the experience will be great from beginning to finished result. And after seeing wonderful new (at that time) yarn Heichi, working with which was the new adventure I wanted to embark on. Here IT IS all shiny and new – Shibui Silk!

Shibui Silk booklet published January 1 this year is a work of more than just one wonderful yarn, I was lucky enough to work with 3 (!!!) silk-containing ShibuiKnits yarns. What can top that? Silk here, there and sometimes double dose of silk in a single project. Contrast between yarns’ individualities and textures is great, but main idea behind ShibuiKnits concept is to juxtapose different materials that would create “beauty with a touch of bitterness”. A true Japanese feel and approach. It’s by keeping this philosophy in mind I tried to create through combining and transforming Staccato, Heichi and Silk Cloud into knitwear. And not to forget amazing creative crew at ShibuiKnits Darcy, Kristin, Jenny and eagle-eyed Alexandra who turned this booklet into what you see today!

Last year’s summer was a very hot one in Japan and for us, knitwear designers, it’s the busiest production time to get all new and exciting things ready for cooler season. One would think that silk on it’s own is more of a gentle and summer-like fiber, but don’t be mistaken, with its wonderful properties of softness, drape and flowing fabric silk keeps plenty warm. In several garments and accessories I have paired the yarn together with Silk Cloud to give them more delight to increase its wearability during freezing months, besides give magnificent squishy comfort that reminds you of wooly winter knits.

Arnett
Arnett is more than just a long coat, it’s one of my favorite transformable garments that I have created. Tricks of this coat are numerous: it’s convertible, reversible and transformable!
The construction of Arnett is practically seamless – just one on the neckline and several faux seams along the sides and raglan lines to express structure. Both fronts are actually doubled width and thanks for nature of the fabric and its positioning, these “extra” fronts turn into various shapes for collar or transform into modular and functional pockets. Turn it inside out, overlap the fronts and belt it and no winter chill would get to you since it’s made in Heichi and Silk Cloud. If I were to call it “coat-I-live-in” I would, but Arnett sounds prettier.

Francis
Innovatively constructed tee with a surprise in the back. Worked horizontally it’s full of techniques to learn, but still quick to make in tweedy looking Heichi. One may find it a challenge, but follow instructions as you knit step by step and you will find that enlightening moment when you learn something new! (But tutorial is to coming though). Worn on its own but easily layered it can even be worn backwards. Opening in the back actually helps the silhouette to flare out although there is no shaping on the sides.

Laverne
Now that is another convertible piece. Jacket with long fronts actually has button front closure and hidden drawstring goes all the way around top neckline. Toss one front over your shoulder for cosier look, button it for a dramatic looped front or pull the drawstring to create gentle pleats all around the jacket. Almost mindless but lustrous and amazingly drapey knit is created using Staccato.

Ada
Fun vest or a tee worked in Heichi with uneven hem and a Silk Cloud longer hem in the front. It features an usual continuous shoulder construction and square neckline. I have chosen to make expressed faux seams even though majority of it is worked in the round. Rustic look of Heichi silk and lush of Silk cloud are a perfect example of texture juxtaposition.

Goltry
Believe it or not, but this hat is completely reversible with 2 differently looking textures on each side. Stitch pattern used is very stretchy that can accommodate large hair or give more slouch as it’s worked in silky Staccato which provides visible shine and drape. Worked in the round it requires minimum of finishing.

Tulsa
Well-thought out use of pleating stitch creates texture and dimension in this scarf. Knit in Staccato for great drape but pleats are providing more structure and creating ruffling effect within the fabric itself. Make it wider for more of a shawl effect or longer if you desire more ruffles adorning your neck and shoulders.

Marlow
This shawl will be easily favorite during winter months as combination of yarns used create tactile perfection. Staccato has great stitch definition and radiates through the nimbus of Silk Cloud and are worked in gradated welts pattern to transform it into a scrumptious shawl.

Prue
Fingerless gloves are never enough in my household whether on a bike ride or to pull over your leather gloves for extra warmth during blistering weather outside and many other occasions. Worked in same yarn combination as Marlow with textured welts pattern it can make a quick gift or treat of luxury for yourself. It will feel like putting on balm by cuddling your hands up in these luscious mitts.

Now… fun times!!!

To say thank you to my readers and fearless knitters I am giving away 3 Shibui Silk Booklets and 1 silky skein each of ShibuiKnits Staccato in color Chrome (seen in Prue and Marlow).

Please leave a comment below (1 comment per person please) about which design you find as your favorite from Shibui Silk booklet with your contact information (email or Ravelry ID) by March 12th, 2012 midnight PST. Thank you everyone!!! Entries for giveaway drawing have been received and are no longer accepted. 3 winners of Shibui Silk Booklet and a skein of Shibui Staccato will be announced March 15, 2012.

Like Olgajazzy on Facebook

Three lucky winners will be randomly chosen from the commenters below.
Good luck to everyone and Happy Knitting!!!

Winners

I hope all have been well and ushered the New Year of 2012 happily and properly insulated with your favorite knits. New Year here started very eventful in every sense – from a shake up earthquake on January 1st (we are well!) to exciting releases of collections and designs. I am excited to talk about them and stick to my resolution of being a better blogger.

But first I need to attend to important piece of business, the 3 winners of BSA patterns giveaway are:

Michelle
KT
Nerdy Knitter

CONGRATULATIONS!!! Each of you is getting a set of my 3 new patterns published by Blue Sky Alpacas. And thank you everyone for participating, there are more giveaways planned this year, so don’t despair, keep knitting and I will make sure you have more patterns to knit from.
Meanwhile, aforementioned ladies if you could please contact me via email listed on my blog with your address information.

So to start with one thing at a time, while we are talking about Blue Sky Alpacas, the new catalog of theirs has been released in the first week of January, that included my new design with a little of a namesake, called Jazzy Cardigan. In reality it’s more of a cardicoat. Made in scrumptious, air light, yet very warm Techno.

The choice of this cable pattern was not accidental, my love for anything geometric and this cable conveys the balance between organic flow of a cable yet with rather geometric shapes mixed in between.

Although looking complex, cable-making becomes intuitive throughout the process when you tend to “read” your fabric below your needles. The flowing cable bands seem to “prompt” you on the next step. The cardigan is worked in pieces, but with button bands incorporated with the fronts. Seams give enough structure and stability to the loft of the yarn while cables reflect the 3D texture of the coat. I have chosen to go with “afterthought” pockets, since they can be done as an option, but personally are very comfy to hide your hands in when it’s chilly outside and you don’t have your gloves/mitts. I am really keen on modern styling that BSA have chosen for this cardigan, but I can also see it styled with a pencil skirt for a more dressy look.

On Ravelry

On Blue Sky Alpacas

Happy Knitting!

Holiday giveaway

Less blogging, more knitting these days. These are not particularly words to go by, but not so much of personal knitting.
Around this time last year I have been working with Blue Sky Alpacas yarn company on creating new designs for this fall/winter season.
Notice the gorgeous models that are are modeling my knitwear designs, great styles and photography too! I feel really lucky to be able to work with this company and their luxurious line of yarns.
As a result you can see 3 various garment designs using Suri Merino, Sportweight Alpaca, Brushed Suri and Techno…

Pleated Jacket
View on Ravelry

While constructing this design, I really wanted to make it with little seaming as possible while trying to incorporate this wide box pleats collar. I have succeeded in doing so, this jacket is worked top down and you only have 2 small seams to complete once you are finished knitting. Classic feminine design with modern detailing on the collar.

Fitted Lace Pullover
View on Ravelry

In wintertime it is great to have one of those fitted thermal go-to sweaters that you want to wear around all the time and depending on your color choice you can have one transition from casual to evening looks. I have chosen to use 100% alpaca yarn but the idea of wanting to balance out the heat factor, since alpaca is 30% warmer than wool, I have chosen to go with this eyelet lace pattern and evenly distribute it throughout the pullover. It creates sort of “vents” for your skin. Finished with ultimately luxurious and soft Brushed Suri collar caressing the neckline. So your choice of favorite denims, favorite slacks or a full skirt!

Aprés Vest
View on Ravelry

I was among the group of few designers who got to test this new yarn and create initial designs from BSA Techno. This yarn features amazing construction on its own – a mesh tube that has alpaca fibers blown into it, which makes this yarn air-light and luscious, as good as luxury comes! For example, if you make a cabled coat in it, it would weigh much less, it is not spun but it reminds me of woolen spun yarns, that are lofty and soft and light! The vest I have designed using Techno is suppposed to mimic one of those down type vest you wear in cold season either to layer or to throw on for a car ride. Despite being so lofty, it is very warm as it majorly consists of alpaca fibers.
And yes this is beautiful Raina from American Next Top Model modeling the vest! (She recently appeared in Bon Iver music video! Love that band!)

So as a gratitude to all my supporters and in lieu of upcoming holidays I am giving away 3 sets of patterns, each set contains a printed copy of each the designs above.
Rules are simple, leave a comment on this post by Tuesday, December 13th, 1:00AM EST
I will randomly choose 3 winners and announce them later on the blog.
For all participants, please leave a valid email address or link to your valid blog, so I can contact you later.

Good Luck To Everyone and Happy Knitting!!

Knits and pelts


Have you ever as a crafty person clung to fabric leftovers for years in hopes that one day you’d have just the right project to use it for? I know I have… and as much as many of your would like deny that once you deal with fabric or string or yarn.. it’s hard to get rid of leftovers in general! Your mind doesn’t always come up with ideas that very minute, but in some time you hope it does! This same route I’ve been going ever since I’ve discovered this faux fur! Honestly, it’s the best faux fur made in the world, so I am sure you can see my point about holding on my scraps…

I have had this idea for a while, but as usual timing and whole slew of things in the way… Finally, I made it! The hardest part was picking out the color of the yarn that would match my faux fur color close enough, but yet not distract with its texture or color variation.

Faux fur produced by Tissavel is one of the best in the market, Made in France, feels and looks (most animal prints at least) like real fur. So real, in fact, one day in D.C. I was walking to work from a metro station and startled by some (PETA?) guy screaming: “Do you know what your coat is made of?!!!” To which he heard my response: “Yes, cotton and viscose!” He was stunned and I walked away winning! 🙂 So my point is that this faux fur even with undercoat of different shade looks very real. I know if one touches it – all you’ll want is to pet it all day!

I’ve had some Tissavel leftover pieces from my mom’s work for a while now. I know even some friends of mine got bits of it here and there as well, it’s really great!

But if you are not a fan of sourcing out a pieces of faux fur you like or fuss over sewing at all, you can go knitting route all the way. And you can do that using two methods:

First, you can find the yarn like Berroco Nanuk or other fluffy yarn that would make a nice cushy pelt for the center of your scarf.

OR

You can knit ANY yarn to create center rectangle using Loop Stitch technique. I suggest using some yarn with a great content of alpaca or suri, so it’s even fluffier. If you wish you can even cut those loops, so it’s more fur looking… Kind of like this Stella McCartney fur vest.

Fur substitute rectangle should be 12″ by 14″ if knit flat, when folded and seamed into a tube it should measure 6″ by 14″.

Now for the ends:
I’ve used Pear Tree 4-ply Merino yarn, which is 100% Australian merino. It’s more of a DK weight and I used US 6 (4mm) needle to go with it for my knit 2, purl 2 ribbing pattern.
My gauge is 7.5 sts per 1″ over Ribbing pattern.
You can choose a different stitch pattern for knit part of the scarf as long as you get the necessary dimensions.
Scarf width should measure 6″ in washed and blocked form. I suggest to make a little swatch to calculate correct number of stitches to cast on for your yarn choice and needle size.

Cast on 46 sts.
Row 1: *K2, p2*, k2.
Row 2: *P2, k2*, p2.

Repeat rows 1-2 until scarf end measures 35″ from CO edge. BO all stitches in pattern. Then make a second scarf end identically. Weave in all ends, soak and block your knit scarf ends to measurements.

For faux fur insert cut 12″ by 14″ rectangle plus 3/4″ seam allowances.

Fold the faux fur rectangle with public side facing inside, then pin first scarf end to the right edge in place between 2 folded ends of the fabric. Stitch by hand to hold in proper place, making sure that sides of the scarf do not bleed over the marks where the knit insert has to be stitched.

Take second knit scarf end and repeat as for the first scarf end only pinning it on the other side of the faux fur rectangle.
Once knit scarf ends are placed properly, use sewing machine to stitch the scarf ends securely in place. You can go over it several times if you’d like.

Then shift both ends of the knit ends to one corner. Pin, then hand stitch to hold in place along the side. Machine sew along the edge to close the side of the rectangle as much as possible with ends still sticking out. Trim excess selvedge fabric.

Carefully pull on the knit scarf ends and turn faux fur rectangle inside out. You’ll have two scarf ends attached to a fur rectangle. Last piece of business is closing that small opening. Using sewing needle and matching sewing thread hand stitch it closed by inverting the selvedges inside along the lines and sewing it shut in a manner of small Mattress stitches.

Voila!!

Now you can get one yourself as well or there is still time for holiday gifts!!
Happy Crafting!!!

Indian summer


Sunset over Mt. Fuji viewed from Inomuragasaki Beach.

All past week we have been roasting here in Japan. Indian summer full on and living in a place that faces South turned my regular dwelling into a sauna of sorts, but I have been enjoying it nevertheless. Dry autumn days, spider colonies taking over many trees, orange hue of Halloween garb everywhere, faint scent of burning fireplace – all of it in premonition of cold weather taking over soon, but oh so pleasant.. To stop routine of the day with a cup of hot chocolate, couple chapters of a new book, think and reflect a little.

To be happy of the small moments and joys. Be appreciative of the present. Whether a big project coming to its final stages and feeling of accomplishment that relaxes and encourages to take on new adventures. Or just several hours of the day spent in a company of friends who understand your humanity.

The sky has been coming up with most bizarre and breathtaking patterns over colors at sunset.

And then back to the grind… so many things to knit..

Hado for your head

How did October happen already? Summer.. is if it never happened, the busiest time for knitwear designers, getting all delicious knits ready for Fall/Winter collections. But I want to still document and share my year’s work.

All the way back in early Spring I have been asked by Andie of Renaissance Hand-dyed Yarns to consider creating a design using her naturally dyed yarns. That was what draw me at first, but who can pass up an opportunity working with Blue-faced Leicester wool, that is one of the softest and luxurious things in this world! While swatching and thinking of the possibilities I have decided to settle on this lovely color combination pack to create a slouch hat. Not just your regular slouch, cool enough to show off the colorwork and with some lace thrown into it..

It almost has a Missoni feel to it, but what is great – one can easily choose to customize it. I have worked it using 4 colors in this pack, but one can easily choose to make it a solid version or even transitional colors to show off “ombre” effect.

Hado Slouch

Hado 波動 (jap.) – wave motion, surge.
Colorful reflections on water surface and gentle breeze waves are recreated in this slouchy hat through intuitive lace pattern and combination of stripes to brighten up a chilly day and keep warm.
Fingering weight
24 stitches and 56 rows = 4 inches in 3 by 3 rib on smaller needle
400 yards (366 m)

$6.00

This design has great potential for leftover fingering yarn, another stash-busting project or a gift that can be loved and well-appreciated. Taking a page from recent madness over Missoni line in Target, you can easily make some for yourself if you are a fan or have missed that event. I am a known “offender” in loving chevrons, Missoni-styles, so you can also see my other designs like Serapo Hat and Palisel Hat.
Now I will be back with more once I finish some pattern writing for new designs 😉

Dot Dot Dot


Trying to remember now what is that moved me to design this… Winters in Japan are pretty mild, just cold, dry and sometimes windy and rainy, not much snow where we reside. Mix of grey skies during the day and if we are lucky enough – a pretty sunset over the mountains. So being tired from dull greyness after a long winter, eye is simply begging for some color.. In anticipation for first Spring colors I became impatient and in February while perusing fresh off the runway Fall/Winter 2011-2012 runway collections I had POLKA DOTS stuck in my mind! I have purchased this souvenir yarn from Purl Soho in New York years ago while on a quick trip with Vanessa.


Mizutama (from Japanese) means exactly that – polka dots.
My Mizutama shawl used a perfect bright, almost acid yellow yarn. Yellow and grey combination has been one of the longest color obsessions I’ve had, so I thought the grey of the skies would go so well together.

The design is a triangular shawl, but in a pattern I give 2 choices for knitter to make it. You can either start from the tip and increase it, so naturally you would get more and more stitches with each row. While knitting it that way, it is easier to customize and make the shawl even bigger/wider wingspan.
The other option in the pattern is to start with the biggest number of stitches and continue working it down towards the tip of the shawl. So whichever strikes your fancy – you can do it all!

Ravel It!
Yarn: Koigu KPM 2.5 skeins or 470 yds of any other fingering weight yarn
Needle: US 6 (4 mm)

$7.00

On a nice spring day when disaster struck Japan, I was actually getting dressed to go to a local park to take photos of my new designs, Mizutama was among them, I stood in the bathroom doing my hair while doors and everything started violently shaking..
I have tried to put my stress to work, still thinking of the situation, but trying to do something that would bring some feeling of normalcy to our everyday life… This pattern was published back in March.

We did go to that park later in the day to find a gorgeous Mimosa tree in full bloom with millions of yellow globes that are were also speaking polka dots to me…