Category: process

:: Akomeogi Tunic ::

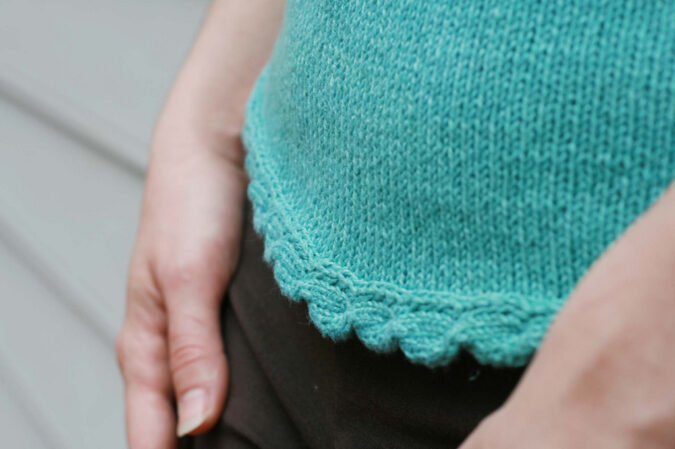
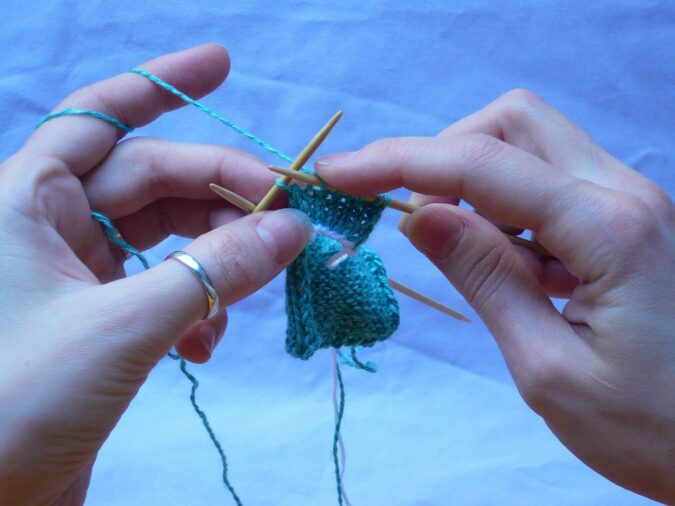
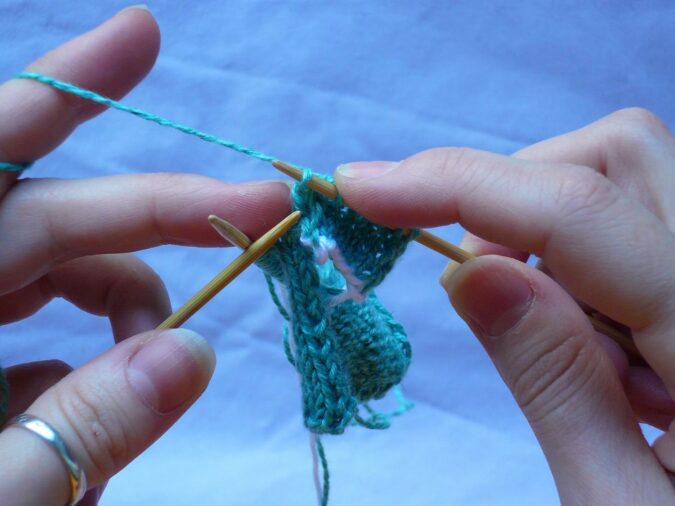
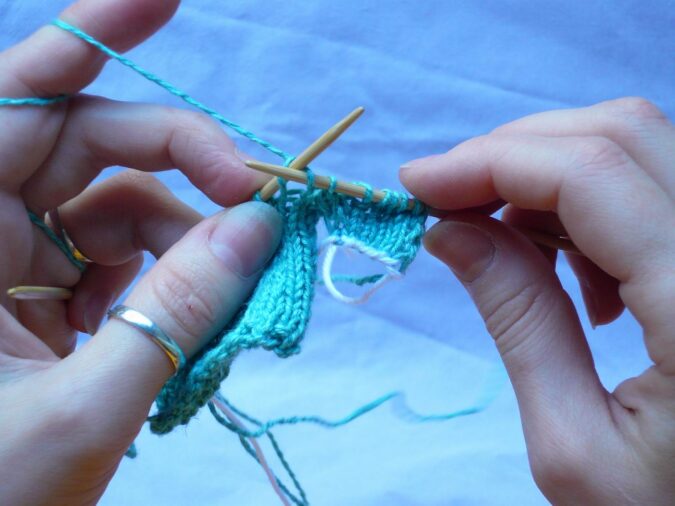
I want to share a great joy of mine, of being published in Interweave Knits magazine, this is my second design for them and I am really pleased how it turned out. I want to publicly thank Eunny Jang and Lisa Shroyer for dealing with my difficult situation at a time to have this out of me. This experience was utterly amazing, because I took so much from it, being challenged to be presented with a wonderful opportunity at the most complex time of your life is something indescribable, but this is what you call life . As trying to motivate yourself regardless that things that needed to be done and testing self-discipline no matter what. I didn’t come out all bright and shiny, some tasks failed, some I persevered through. And here you can see the outcome. I am going to write more about Petal Halter with a tutorial later. But for now, I give you Akomeogi Tunic, which in translation from Japanese means “folding fan”. To be honest, I had the sketch and yarn for this garment since June 2007. But what all of you get to see in a finished project is a bit processed from this original sketch.

And here it is, photoshoot from Interweave Knits Summer 2009. I am so grateful to the editors and stylists and the photographer who took so many details pictures.


photo courtesy of Interweave Knits website

And yesterday, as Knitting Daily presented their galleries, I saw it being modeled by many different ladies: ages and figure and ease.
So head over there and make a judgement for yourself.

On a personal note, I learnt that I enjoyed working with linen yarn to such extent that I have acquired a new object of desire. Linen in all kinds and weights. It is perfect for sticky and changeable DC summers. This particular design reflects my taste and my desire for knitwear to carry, some are very wearable and plain, but some boutique pieces that retail for hundreds and hundreds with an oomph to them, the unusual that every woman has and yet to express it. I love expressing mine through what I wear, this is not just a cloth to cover yourself, but also reflect on how you feel. I love fashion and everything about it, it is again a theatre, just a medium for others to percept your real self.

And now, I remember I have Louet and Lin-net linen to play with, hmmm! Possibilities are tasteful!

time to show. 3 at a time

It has been months since I showed off my Habu explorations, as it seems to be the only projects/yarn/concept I am being drawn to in between my deadline projects..
I am… I have accumulated 3 finished Habu garments.. shame on me, heee.. well. I just didn’t have time.. I wrote a huge post… clumsy me, hit something on the keyboard and it was gone.. sometimes this happens, but at that moment I was almost done, so pulling my hair out or just yelling some words to my non-russian speaking cat.. didn’t fix it.

So here that goes..

nymphadora
The first is a long time “yo-yo” cocktail commute project, it all has started from Vanessa sending me some leftover caramel colored Rowan KSH.. I added some test skeins of Habu Silk Mohair A-32b and there you have it.. a Nymphadora Scarf.. it is super long.. just like I wanted.. at one point I was about to toss it into a washing machine to perform some hazelnut stuffed shibori, overlooked at Nicky Epstein’s Knitting never felt better, but then.. I haven’t decided on it yet.. it is simple, yet cute, starting with frequent striping transitioning into wider ones. So I need a public opinion for once: Should I or should I not proceed?

nym1
nym2
And then there is a kit I got.. and long time wanted, ever since Isel pointed out the fabulousness of it while paging through my copy of Setsuko Torii’s Hand-Knit works. Though I have knit a skirt before, it was a little worrying me how the silk would look and behave while worn around one’s behind!
I didn’t have any help on taking a decent photo, so self-timer on the edge of my balcony was the best friend for time being..
Here is a triptych, click on either to zoom

vintageHabu:: Kit 102:: darkHabu::Kit 102:: light
habu::kit 102::gradation tsumugi silk skirt
Habu Textiles
Gradation Tsumugi Skirt : kit-102: A-1, 5 or 6 colors triple stranded and wound in 10 variations in mini skeins (come ready to knit in a kit): charcoal: US 7 (4.5mm) needle: 30″ of 1/2″ black elastic.

This skirt became a success because I had a great buddy in face of Julianne (Ravelry link), who was making this skirt at the same time (she is actually making also a habu mohaired skirt as well!), so we got connected and figured it out together, we had to email Takako once. As usual she was very helpful and it was all cleared out. Printed english pattern had some typos, but it felt good about putting some idle brain cells to work. J apanese patterns are all about math afterall. I will be posting some tutorial-like on the corrections and modifications I did to this design on Habu KAL shortly.

I have eliminated seaming, by doing provisional cast on and grafting it to the end of the fabric after and did a casing with elastic instead of drawstring, just by knitting extra fabric and turning it into a hem.
And eliminated doing 2 parts of the yoke, by just picking up and knitting garter stitch in a round, but still doing the decreases along the sides indicated by strategically placed markers. The least favorite part- it took about 2 hours and tons of patience just to weave in those zillion of ends, but in the end I saw how it improved the sturdiness of the bottom edge.
The skirt before blocking looked like an elongate mini.. and original is shown in your mid-calf, I am not a model height, so just below the knee was the right length and I wasn’t blocking it to the original measurements. But, seriously, if you are taller and need longer skirt, it will block out , plus it is silk and in a skirt gravitation power would still pull it down.

The next was a secret gift.. which I can reveal today, Happy Birthday, Vanessa! It is my Birthday gift for her!

It is linen paper A-60 from Habu again, in two colors used for A Chinese Style Pullover aka kit-89. I have used the pattern from my book and US 9 needle, though next time I make it I may try it on recommended US 10 (6mm).
I love how airy and noisy this project was and is as a garment. Kirsten of assemblage fame pointed it out, this is a musical garment at some point.. so who needs a fireplace with crackling firelogs? Just get one of those and you kill two birds at the same time!
I hope V enjoys wearing it! It is perfect for steamy summers, as you get style and breeze constantly!

tunic1

more news and projects coming soon, they are all ready for blogging, just need to acquire some decent pictures

Get technical. Pix heavy

Thank you everyone on your warmest comments and wishes on my finished projects! It has seemingly warmed up here, and mid 80ies trying to get you to the outside events, knitting 100% wool on the balcony in the sun afterall may not be such a good idea =)

Here is relatively new section of my blogging experience: tutorials and know-hows.
Most of us know the idea of a knit-on border. When there is a piece of knit fabric that you create as you go whether it’s lace or cable you work it and attach every row onto your garment. In this case you will always slip the last stitch of your RS row and pick up a stitch (or knit a stitch if the stitches are live) from the border of the garment and pass the slipped stitch over. Turn work and on the WS slip your first stitch and continue the row.
Note: Gauge of the border and the garment may vary, so make sure how your tension works for you: you may want to go down or up one size of the needle.
To make is easier with the numbers, I made a chart and a legend to make it easy:

Using scrap yarn and provisional cast on method with a hook cast on 7 sts. Next RS row already start knitting with main yarn the 1st row of the pattern above.

1 . Work your row to the last stitch.

2. Slip the last stitch knitwise.

3. I had live garment stitches, so I knit 1 stitch of the garment with my cable border yarn.

4. And Pass the slipped stitch over.

5. RS is row done, turn work and start working the WS row by slipping the first stitch.

6. On the cabling row I do not like using the cable needle (few stitches to work on). But for better visual you slip the first 3 sts on the cable needle and hold them in the back.

7. bring the yarn in the front. Knit next 3 stitches.

8. Then work the 3 sts from the cable needle.

9. Work the last stitch of the row as usual on the RS row: slip, knit1, psso.

10. And this is what you get when you have the cable border knitted on the live stitches of the garment.


NOTE:
As the cable border is still stockinette stitch it will curl due to its nature, the best way to prevent this is to block and steam each curve of the cable out and let it dry in that position (if wet it will just curl back), but you can also alternate by adding 1 extra garter sts on the outside of the border to get rid of that problem.

One can also perform this as an i-cable, attached i-cord, but cabled one, I have tried it and in order to succeed in it, you will have to take needles 2-sizes down to compensate the stretch of the fabric behind your facing side. 7 stitches is a stretch for me. That method would work great on stitches from 2-4 (without cabling them apparently) to create a horizontal aran knitted on the surface of the fabric (when knitting vertically is not enough!)

Question, opinions welcome! Happy knitting!