Yesterday, I have been deep in thought while sizing a pattern, deadlines all looming and sooo much to do before the year’s end. I have thought to share a great little technique with you. Something last minute that you can make for either a gift or for yourself! It’s been cool, so having that tiny bit of precious cashmere caressing your neck certainly felt cozy.
So here is what you would need:
Time: 1.5-2hr (excluding drying time).
15-20 grams of Fingering or Sport weight yarn.
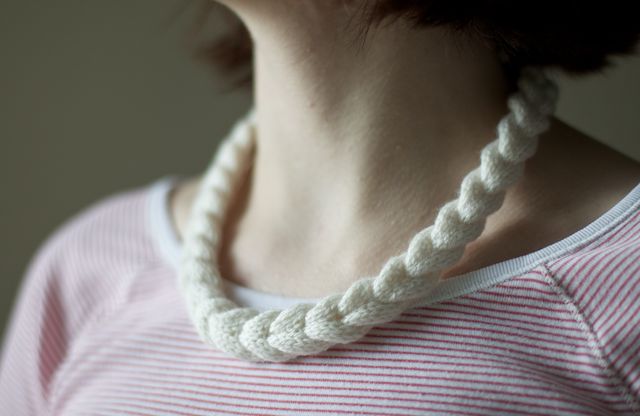
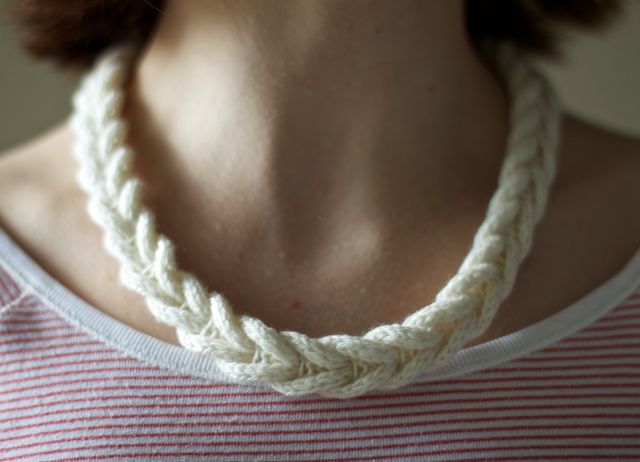
Make sure to choose something delectable, tiny bit of cashmere, royal alpaca, merino or qiviut. Try the yarn on your neckline area first to determine the itchiness level as it’s highly sensitive area. So you don’t end up ripping necklace off after 10 minutes of wearing it. Finished/braided necklace measures approx. 22″.
Needle: US 4 (3.5 mm)
Crochet hook C or D.
Gauge: 6 sts and 7-8 rows in 1″ over Stockinette stitch swatch
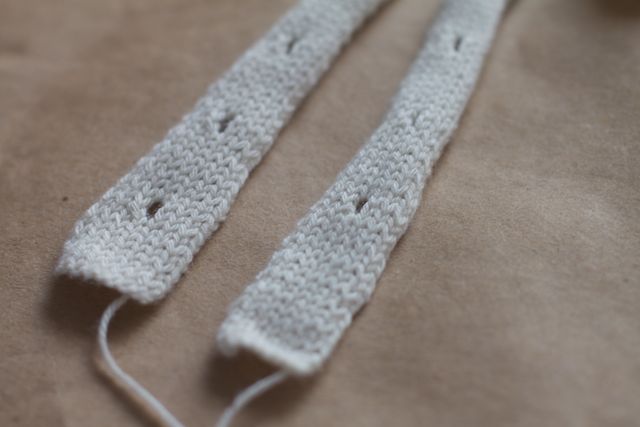
Cabled Braids are made up by knitting 2 strips.
1st strip:
Using needle and yarn CO 9 sts.
Start by purling the 1st row. Work a total 7 rows straight in St st. On next row (RS): K4, yo, k2tog, k3.
Repeat previous 8 rows for a total of 16 times. Then work 15 rows in pattern. BO on the next row.
2nd strip:
Using needle and yarn CO 9 sts.
Start by purling the 1st row. Work a total of 15 rows straight in St st.
On next row (RS): K4, yo, k2tog, k3. Then work 7 rows in St st.
Repeat previous 8 rows for a total of 16 times. On the next row BO all sts.
If you wish to make strips longer – repeat the sequence from *.
Wash your strips, make sure to use wool wash to help and fluff those fibers. Or steam the strips if you don’t have time.
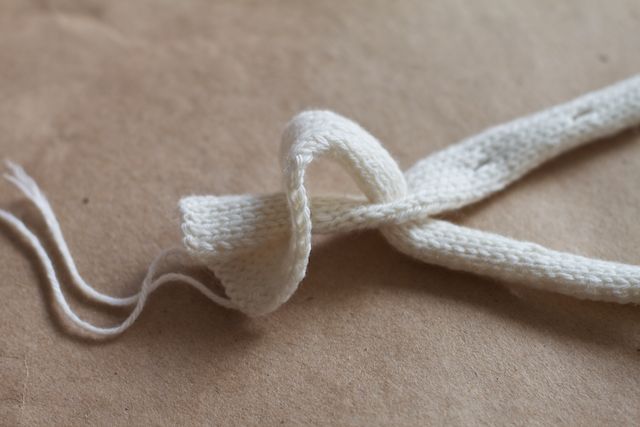
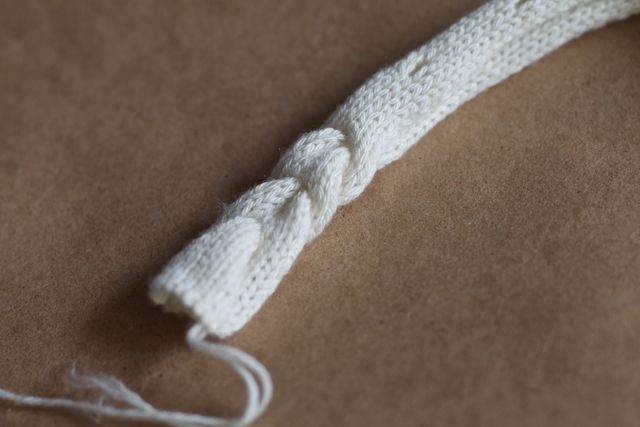
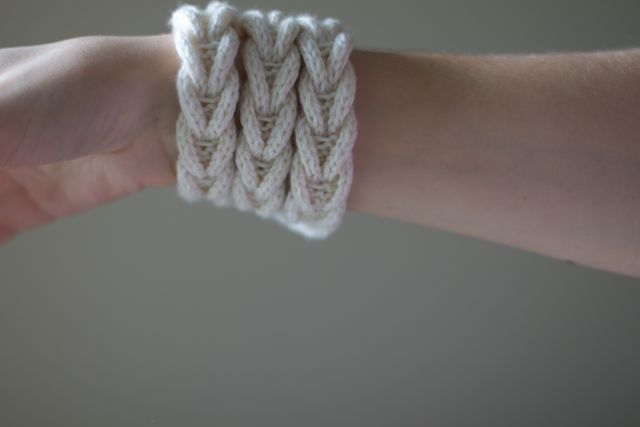
Then follow the photo guide to braid your necklace or bracelet or headband.
Insert the longer end of a strip into the first yarn over of the shorter end strip.
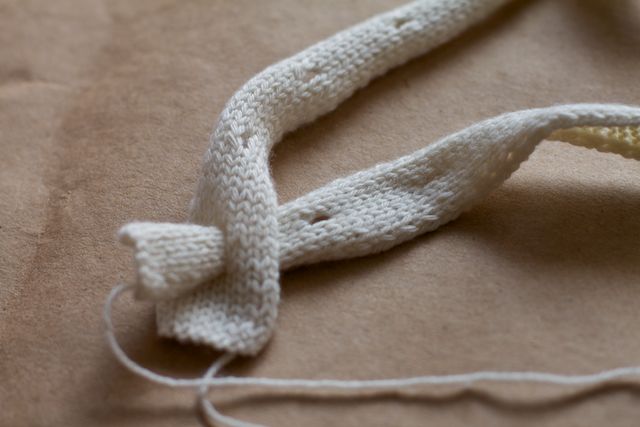
Then insert the top strip into the yarn over of the strip below (the first yo of the longer end strip).
Then continue inserting the top strip (they will alternate) into the next yarn over, make sure not to miss any and tug on them evenly.
The view from down under.
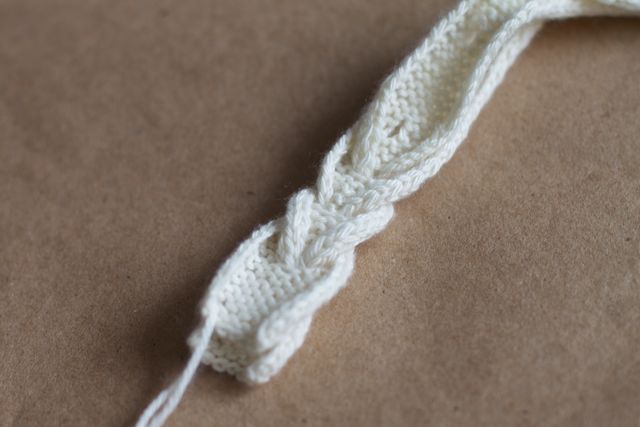
Continue braiding and once finished you will get two different textures in the same braid. Neat!

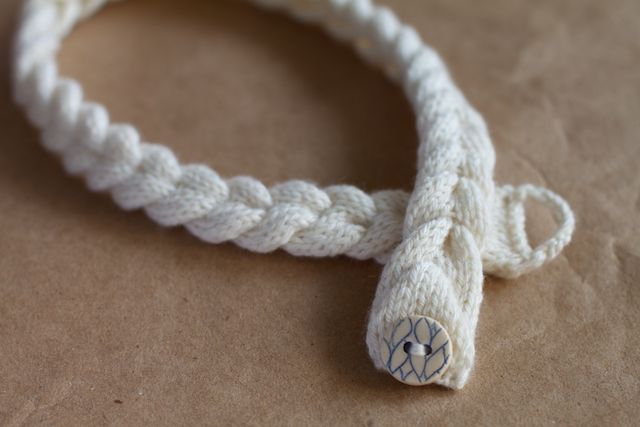
Using crochet hook take the ends of yarn and crochet a chain to make a loop to work as a buttonhole. I have flattened the edges of the strips and joined them together just by whip stitching.
I have had these gorgeous ceramic buttons from Jenny Potter for a while and the print on them matches the texture perfectly! Just sew on the button on the other end and weave in all ends.
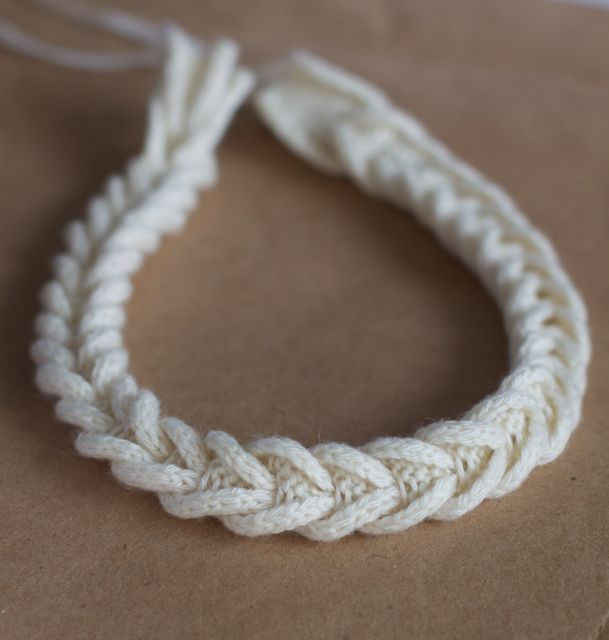
There are multiple ways of wearing this little accessory. 22″ length was perfect to wear around the head as a headband.. almost makes me think of those very 50ies Prada cabled hair adornments, but I don’t have hair long enough to demonstrate it.
Or a nifty bracelet ..
I hope you all like it!
Happy Crafting!!!
IMPORTANT: THIS PATTERN IS FREE FOR PERSONAL USE ONLY! ANY USE OF THE PATTERN OR FINISHED GARMENTS MADE USING THIS TUTORIAL AND INTENDED FOR COMMERCIAL PURPOSE WITHOUT WRITTEN PERMISSION ARE PROHIBITED. COPYRIGHTED. 2010.
Translated instructions for Cabled Necklace in FRENCH.

Beautiful, thank you!
How cute! Especially love it as a bracelet. Thanks for the pattern.
This is adorable! Thanks so much for the pattern. I guess I know what I’ll be knitting next…
Very clever construction :-))
Thank you for sharing :-))
Wspaniałe w całej swej prostocie. Pozdrawiam.
Absolutely amazing 🙂 So simple yet so creative and smart 🙂
What a cute idea and I love the construction.
Supremely clever and very cute!
Absolutely Fabulous! I’m off to go through my stash of left over yarn bits Now…
Brilliant! Thank you for the pattern!
We don’t just like it – we love it 🙂
Love it!
that is so awesome!! thanks for sharing olga!
Genius, the chicest things in life are just so simple.. Thank you
LOVE IT. Thanks so much for this.
Delightful! Wonderful gift (for yourself or others)!
Genius ! Thank You for the pattern 🙂
Ingenius! And very very cool. 🙂
This is awesome Olga!
WOW this is just perfect !
Thank you so much for sharing
this is sweet. I wonder what it would look like with a semi solid or variegated colorway
c’est génial !! Merci
Stunning. Thank you for sharing.
Wow! It is so simple and yet so adorable:)(well,simple things are often like that:>)You do really great job with all those patterns, not mentioning about being a lovely model:)Thanks for sharing!
Super!
gorgeous- can’t wait to make one!! Thank you so much for sharing 🙂
I love it, but am wondering what length a shortened version would be, say, for a seven-year-old who might also like to use it as a headband. I have no children available to measure, but would like to send one to a little friend who would love it, too! Thank you.
LOOOOOVVEEE IT! Such a great idea!
Lovely lovely lovely!
You are so very creative, i love this, thanks for sharing!
Olga,
I had so much fun making up this necklace. It is a quick satisfying project. I will post about it when I’ve gotten a chance to take some pics.
Also, I am very happy to pass on the stylish blogger award to you! If you get a chance, come by my blog.
O, I have plans for this pattern! I have some cashmere yarn with sequinse woven in left over from another project that I am going to use to make me a beautiful necklace!
How very cute– and easy!!! I’ve been collecting projects to share with beginner knitters. This is a step-up that will show them that with just an extra technique (yo/k2tog) you can make something special. (NurseLaura)
This is SUPER cute, I love it, this would be great with a black band and a silver or gold band knit and intertwined. I think I might try it.
this necklace is just adorable i totally love it!!!!great
LINDO, ADOREI A IDEIA. NUNCA TINHA VISTO . AMEI
http://mirokaartes.blogspot.com/
hi Olga, I’m French and I have shown (and linked) your wonderful blog to my blog readers – I was wondering if you will allow me to translate in french your cabble braided necklace free pattern- you will get it to post on your own blog of course !
best regards
brigitte
http://madamecrochetlafemmeducapitaine.blogs.marieclaireidees.com/archive/2011/03/04/olga-en-attendant-happiness.html
TO Brigitte:
Thank you for your kind compliments, but the necklace has already been translated, link is posted here!
http://madametrico.canalblog.com/archives/2011/02/02/20279097.html
Love it! Thanks for sharing this pattern. It really is so easy to make, I may make a few more!
I have taken the liberty of translating the instructions for your Cabled Necklace in Norwegian, and here is the translation:
Velg et garn du synes passer til pinne nr. 3,5.
Strikkefasthet i glattstrikk: 6 masker x 7-8 pinner = 2,5 x 2,5 cm
Strikk 2 lengder
–
1. lengde:
Legg opp 9 masker, strikk 1 pinne vrangt.
* 7 pinner strikkes i glattstrikk. På neste pinne (rettsiden)
strikk 4 m rett, kast, 2 m sammen, 3 rett. *
gjenta *-* 16 ganger.
Strikk 15 pinner glattstrikk, Fell av.
2. lengde:
Legg opp 9 masker, strikk 1 pinne vrangt. Strikk 15 pinner glattstrikk
På neste pinne (rettsiden) * 4 m rett, kast, 2 m sammen, 3 rett, Strikk 7 pinner glattstrikk*
gjenta *-” 16 ganger. Fell av.
Vask lengdene eller press de. Følg så forklaringen i bildene som vist i den engelske oppskriften.
So simple yet so creative and smartThanks for sharing this pattern
Super simple and gorgeous!!! I am off to try it. Thanks so much for sharing this beauty!
Amazing!
ORIGINAL, gracias por compartir semejate ideota tan pero tan linda .
Beautiful! Thanks!
Nice… also as a headband!
I always have small amounts of fingering weight yarn leftover from when I knit shawls. This is great for those little bits so they dont get thrown in the trash. Thanks for making the pattern free 🙂
Thanks! Love this!
this is so beautiful! have you made any using two different colors (one for each strip)?
also, i don’t know how to crochet a chain – can you suggest an alternate method for making the button loop? i guess i could always just learn to crochet 🙂
I love this look and the how-to has given me ideas how to use up some cotton jersey in my stash too.
Thanks
Many thanks for sharing. Fantastic work.
Jude
This looks very cute! Thank you for sharing. One question – what is the purpose of washing the pieces? Is it to make it fluffy? Softer?
OMG! I just love it… This would make perfect bracelets…
I love this – I rarely knit these days because most projects take so much time, but this I might actually be able to finish while my kids nap {or maybe a couple of naptimes}.
Beautiful, thank you!
i’m so glad i found your blog!!!
Thank you so much for the pattern! I’ve done mine today, it’s magic the way the braid appears at the very end!
You are awesome, I think I love you.
i love this project! having fun doing it. my one question is, are both the strips supposed to be the same length before they are braided together?
i love this project! really enjoying it. my one question is, are both strips supposed to be the same length before braiding?
Very goog idea ! I am sure to try it very soon !!!
Very goog idea ! I am sure to try it very soon !!!
SIMPLE BUT ABSOLUTELY STUNNING! AM I ABLE TO USE IT TO MAKE TO SELL FOR CHARITY? WOMEN IN ACTION ARE A CHARITY THAT WORK AGAINST SEX TRAFFICKING IN INDIA? OR IS THAT NOT ALLOWED? DEBS 🙂
Hi – such a simple but stunning idea! Am i able to make and then sell for charity or is that not allowed? Debs 🙂
whoops! think i just blogged twice! i am very new to this! sorry!
this is so quick and cool! I also love your knitting patterns, they are so original and unique!
Great pattern. Just made this. Used up some scrap yarn. Managed to make one long enough for a headband . It looks good.
Great pattern. Just made this. Used up some scrap yarn. Managed to make one long enough for a headband . It looks good.
Yes, I have some scrap yarns I would like to use for this pattern. Thank you for the pattern. Lovely.
Molto elegante e semplice, geniale!
ciao e grazie, marina
Me encanta!!!!
Gracias por compartirlo.
Beautiful! Love it so much I featured it on my blog . . . see it here: http://wp.me/p1Hwn4-dY
Precioso el collar parece muy difil al principio pero creo que luego es bastante facil y queda muy original gracias por la explicación saludos
This looks almost easy enough for a novice knitter like me! Thanks!
Sent you a message through Ravelry’s site as well….
Please check and reply when you get the chance! Looooove the cuff!
Thanks!
I just discovered this pattern thanks to Ravelry, I can’t wait to make my own…
You make really pretty things, from today on you have one more fan!
Thank you for sharing the pattern ; )
super chic,und doch schnell und einfach wenn man weiß wie es geht.Danke für die Anleitung
Fabulous! And so easy! Thanks a lot for this awesome pattern.
Beautiful and fun! Can’t wait to try it. Thanks for sharing your pattern.
Simple and unique bracelet!
Thank you so much! Made this is no time for a last minute gift and it’s so gorgeous…may have to make one for myself! 🙂
Thank you so much, Olga. Ineed something to make with granddaughters whom I don’t see very often.They are 8 and 6 and will love these. Now to search the stash for some non-itchy silk and some cotton.
I’m so happy I found you !
Tessa
Lindo,obrigada!
I made this as hand therapy post op. I love it!
http://petitbebecreationz.wordpress.com/2013/09/21/knitting-as-hand-therapy/
Lindo e fácil.
filhadejose.blogspot.com
wonderfull
:*
[…] is a translation of the Cable Braided Necklace pattern by OLGAJAZZY. The original is in english and since it’s a really cute pattern and […]
I LOVE your beautiful pattern. I’ve already knit the two strips but cannot figure out how to braid them! Feel like an idiot.
I’m used to braiding using 3 strips. Help!
Ty.
You braid them by forcing one strip into the hole formed by a yarn over on the other strip, then do the same just now forcing the other strip into the hole on the first strip. Look at the photos, they are quite explicit about that part. Hope this helps!
Just finished my first one and it’s great. So much fun. Hope to post it on Ravelry soon. Thanks so much for the creative pattern!!!
Instructions in Dutch:
Halsketting met kabels van Olgajazzy.com
Nodig: 15-20 gram 4 draads of 5 draads garen, (voor exclusiviteit: cashmere, qiviut, alpaca)
Tip: Draag het garen eerst 10 minuten op de huid om te zien of er geen allergische reactie op ontstaat.
De ketting is ongeveer 60 cm lang
Verder nodig: breinaalden 3,5
haaknaald in dezelfde dikte
knoopje
Steekverhouding: 6 steken en 7-8 toeren in tricotsteek is ongeveer 2,5 cm
De ketting bestaat uit 2 strips.
Strip 1:
Zet 9 steken op.
1: Brei averecht terug.
2: Brei dan 6 toeren tricotsteek
3: 4 recht, 1 omslag, 2 samenbreien, 3 recht.
Herhaal deze drie stappen tot het in totaal 16 x is gedaan. Brei dan nog 1 x stap 1-3 en 1 x stap 1 en 2. Kant steken af.
Strip 2:
Zet 9 steken op.
Brei averecht terug.
Brei dan 15 naalden in tricotsteek.
Stap A: 4 recht, 1 omslag, 2 samenbreien, 3 recht.
Stap B: Brei 7 naalden in tricotsteek
Brei stap A en B in totaal 16 x. Kant steken af.
Was de strips, of stoom ze naar wens om de vezels opener te laten staan.
Weef ze als volgt:
Stop het begin van strip 2 in het eerste gaatje van strip 1. Haal strip 1 van boven naar onder door het eerste gaatje van strip 2. Vanaf dat punt stop je de bovenliggende strip door het gaatje van de onderliggende strip. Ze wisselen elkaar constant af. Herhaal dit tot alle gaatjes zijn gebruikt. Met de haaknaald maak je van de einddraadjes een lus, en zet die vast aan de ketting. Aan het begin van de ketting zet je een knoopje aan. Veel draagplezier gewenst.
Thank you!
Absoltely gorgeou! ThY so much!
[…] Cable braided necklace door Olga Buraya (gratis) Garen: Organic cotton + merino wool, kleur 725 citroengeel Naalden: 3,5 […]
Thank you for the pattern. Even though I’d seen this awhile ago, it’s not until now that I suddenly would love one and am loving it so, so much more!
You do have a wonderful design sense that is truly you! Love!
so lovely… i like it!
Just finished the strips; can’t wait to wash, weave, and wear! Thank you for the pattern. I have a feeling I’ll be getting requests for these every time I wear it.
what a creative idea – great
[…] should’ve been a string of little pink heart for necklace, but the yarn was too soft and small so the hearts were almost invisible. Thankfully the length was […]
The photos are gone! Is there any way you can send them to me or repost them? I think I could figure it out from the written instructions, but the photos would help so much.
It’s updated!
Hi, Olga.
I really like your creation and I am currently making it. I have a question about the last 15 rows on the first strip. Is that all in Stockinette or is it the 8 row pattern plus 7 rows of Stockinette at the end. Please let me know.
Sincerely,
Jennifer
Hi, Jennifer!
It’s all in stockinette.
I have a question after I made the first strip to the sixteen why does it say knit in pattern for sixteen times does that make it a total of thirty two holes
16
I have just found this great pattern while in “lockdown” because of the coronavirus: this pattern is perfect for my mood, of doing lots of bits of things! I have enjoyed knitting two in different colours over a couple of evenings. Thanks!
Thanks Olga!
You’re design is genius! Thank you, it turned out beautifully.
What a brilliant pattern! Learned about you and your architectural knitting at the Madison Knitters Guild meeting à few months back ! This was easy to knit and turned out really cute!
One question: What size button did you end up using? The original link no longer links to the ceramic button you used. Thank you!!
Thank you so much for your kind comment! I used Jenny the potter 0.75″ inch in diameter button, but anything about that size, or even a shanked button would work wonderfully.